Get Started - Original Structure Sensor
Everything from A to Z on using your new Structure Sensor.
Getting Started with your Structure Sensor
Congrats on your new Structure Sensor! We're sure you're eager to start exploring Structure Sensor's capabilities. To help you get the most out of your experience, we've put together this quick start guide to help familiarize you with this advanced accessory.
What's in the box?
Structure Sensor
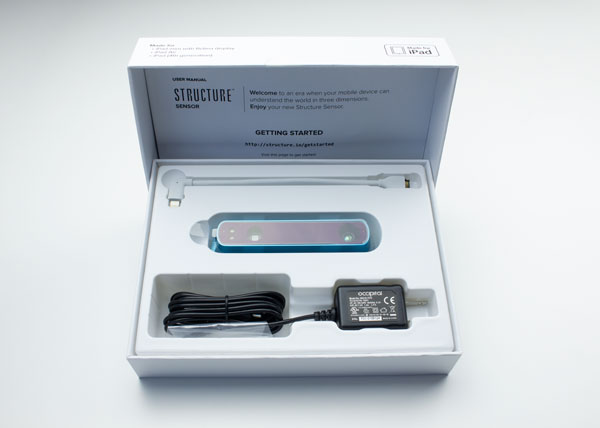
Structure Sensors purchased directly from the Official Structure Sensor Store will arrive in a gift box, like so:
Structure Sensors purchased from Amazon.com will arrive already assembled, in a new "bento box" style, which doubles as a carrying case for your Structure Sensor, bracket, and cables:
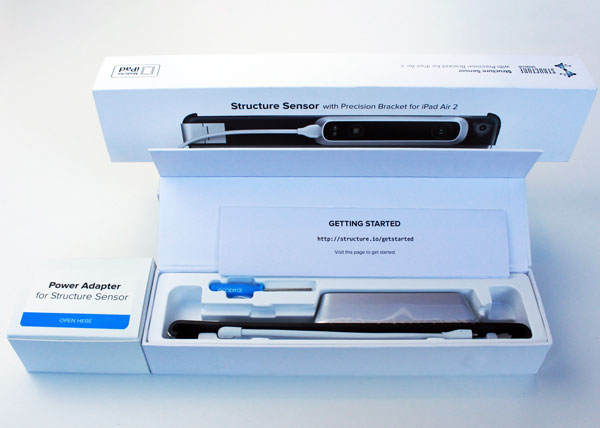
Regardless of where it was purchased, your Structure Sensor should arrive with the following:
- One Structure Sensor
- One Lightning cable
- One Power Adapter
- One magnetic screwdriver
- Eight (8) M1.6 screws
- One user manual
Precision Bracket with Aluminum Latch
The Precision Bracket with Aluminum Latch will arrive in a separate box, like this one:
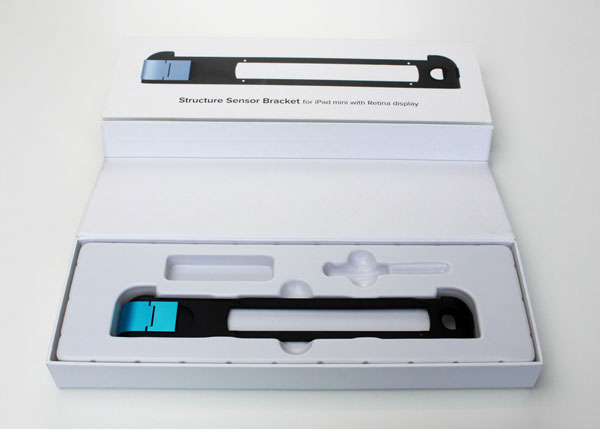
Pictured: Original Precision Bracket with Aluminum Latch packaging.
Precision Brackets with Aluminum Latch for iPad Air 2 and iPad Mini 4 will arrive in a "bento box" style, which doubles as a carrying case for your assembled Structure Sensor, bracket, and cables:
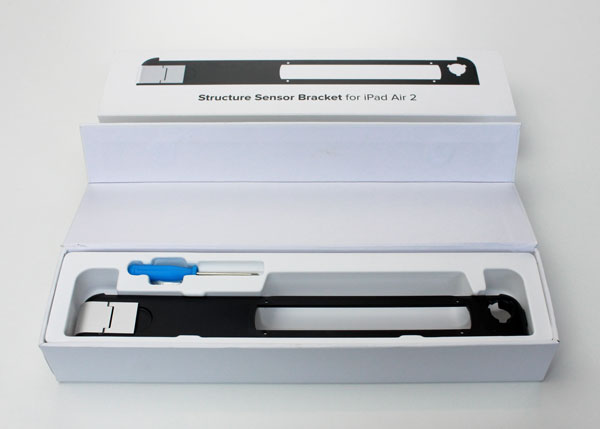
Pictured: Newer, bento-style, Precision Bracket with Aluminum Latch packaging.
Structure Sensor Bracket For iPad Pro

Your Structure Sensor iPad Pro Bracket should arrive with the following (shown from top to bottom):
- One Bracket Alignment Tool
- One Structure Sensor Base Plate
- One Bracket
Charging your Structure Sensor
To preserve the battery life of your iPad, Structure Sensor has its own internal battery. Charging your Structure Sensor's battery is simple: Connect the supplied Power Adapter to the barrel jack (aka the rounded port) on the side of the Structure Sensor, and then plug the other end into any standard 2-pronged wall outlet as found in the United States (if you're outside of the US or Canada, you will need to use an appropriate adapter).
An LED indicator on the Structure Sensor's glass face will pulse when your Structure Sensor's battery is charging. As soon as your battery is completely charged, the LED indicator will stop pulsing and instead will stay on until you disconnect the AC charger.
In addition to connecting your Structure Sensor to any USB 2.0-compatible device, the USB Hacker Cable can also be used to charge your Structure Sensor and will charge the battery more quickly than the standard Power Adapter. USB Hacker Cables are available in the
Connecting Structure Sensor to your iPad
Step 1 — Attaching your Structure Sensor to the bracket
How to attach your sensor depends on what type of bracket you're using. For iPad compatibility information, see the support article titled "What iPads can I use Structure Sensor with?". Choose your bracket type below:
Instructions for Adhesive Bracket for 12.9-inch iPad Pro
Supported models: iPad Pro 12.9-inch (1st, 2nd, & 3rd Generation)
Instructions for All Other iPads
Supported models: iPad Pro 11-inch (1st Generation), iPad Pro 10.5-inch, iPad Pro 9.7-inch, iPad (5th, 6th & 7th Generation), iPad mini (4th & 5th Generation), iPad Air (2nd & 3rd Generation)
Precision Bracket with Aluminum Latch
Customers who have purchased Structure Sensor for iPad from Amazon.com can skip to Step 2.
Using the included screwdriver and screws, attach Structure Sensor to the supplied bracket.

Place Structure Sensor in front of the bracket, and then use the supplied screwdriver and 4 screws to attach the two together.
The data and charging ports on the Structure Sensor should be facing to the left as you look at the Structure Sensor and bracket.

Pictured: The proper orientation for the Structure Sensor is to have the two data ports facing to the long side of the bracket.
Step 2 — Attaching the Structure Sensor and bracket to your iPad
To attach the Precision Bracket with Aluminum Latch to your iPad, start by sliding the bracket plus Structure Sensor onto the top of your iPad, making sure that the aluminum latch is in its open position.

Left: Sliding the bracket on an iPad Air 2. Right: The bracket firmly seated.

Pictured: The bracket's iPad camera hole centered around the iPad camera.
As soon as you have firmly seated on top of your iPad, and you have ensured that the hole in the bracket is centered around the iPad camera, close the latch by pressing down on it with your thumb.

Step 3 — Attaching the Lightning cable to your Structure Sensor and iPad
Connect the supplied Lightning cable by connecting it to your Structure Sensor first.

Left: Plugging the Lightning cable into the Structure Sensor. Right: Plugging the Lightning cable into the iPad.
As shown in the above images, the wider end of the cable connects to your Structure Sensor, and the gold-colored pins should be facing up as you plug it into the Structure Sensor. Connect the other end of the cable (with the Apple Lightning connector) into your iPad.
Your Structure Sensor is now connected to your iPad!
Connecting your Structure Sensor to your iPad Pro
1-1. Remove your 3rd party case from your iPad Pro, if applicable. On a clean, flat surface, place the iPad Pro face down into the Bracket Alignment Tool as shown below.

Note: Make sure the iPad Pro camera is in the corner as shown here.
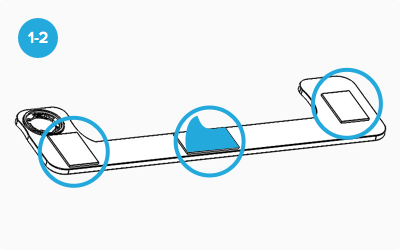
1-2. On the back of the Bracket, peel the backing off from all three adhesive pad pieces as shown.
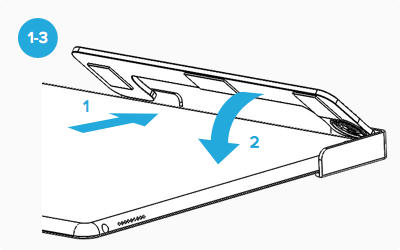
1-3. With the iPad Pro still seated in the Bracket Alignment Tool, position the Bracket at a 45 degree angle into the Alignment Tool. Make sure the Bracket is aligned with the two edges of the Alignment tool. Once aligned, slowly press the Bracket completely down on top of the iPad Pro.
Note: Make sure to keep the Alignment Tool pressed up against the iPad Pro when attaching the Bracket. This will ensure a good alignment. If the Bracket is misaligned, slowly peel it up and try to align again.
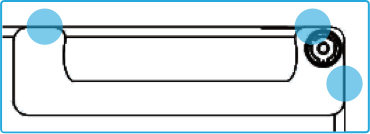
Tip 1: The edges of the Bracket should be in line with the edges on the iPad Pro in three places (as shown below). This will ensure a good calibration of the Structure Sensor.
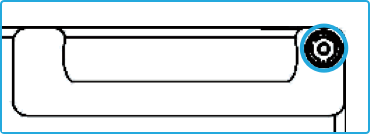
Tip 2: The camera should be centered in the opening on the Bracket.

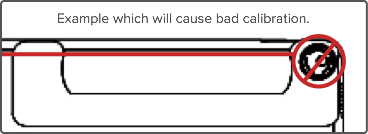
Tip 3: When the Bracket is assembled on to the iPad Pro, wait 5 minutes or so to allow the adhesive pads to fully grip on the iPad Pro.
Step 2 – Attaching Structure Sensor Base Plate

2. Using the four screws and the screwdriver you received with your Structure Sensor, attach the Structure Sensor Base Plate to your Structure Sensor. The countersunk holes for the screws should be facing out when you attach the base plate.
Step 3 – Attaching Structure Sensor to the Bracket

3-1. Line up the Structure Sensor over the Bracket.
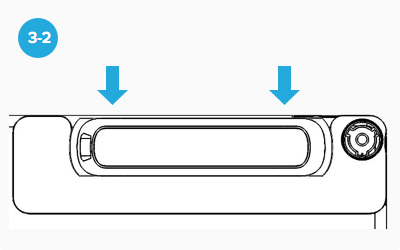
3-2. Slide the Structure Sensor down until it snaps into the Bracket.
Tip: If you angle one side of the Structure Sensor into the Bracket first, the other side will easily snap in.
Removing your iPad Pro Bracket
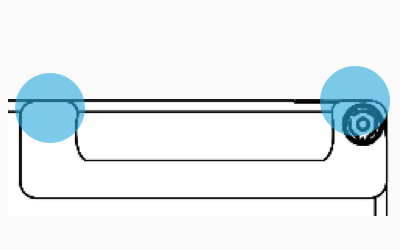
1. To remove the Bracket from the iPad Pro, slowly peel off the Bracket from the top two edges until the Bracket comes off.
2. After removing the Bracket, the adhesive pads will still be on the iPad Pro. The adhesive pads come off easy leaving no marks by rolling from the edge of the adhesive pads with your finger.
Reattaching the Bracket
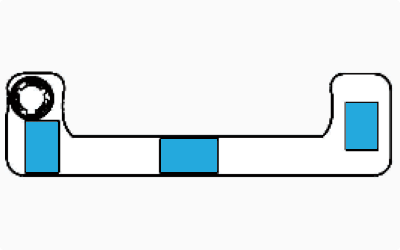
1. To reattach the Bracket to the iPad Pro, go back and follow Steps 1 - 4 again.
2. If new adhesive pads are needed, you can buy it at most stores. Look for 3M VHB Clear Gel tape which comes in a 1” wide roll with red backing.
3. Here are the suggested places to apply the adhesive pads. It is also suggested to use three pieces of the VHB tape.
Using Structure Sensor with a non-iOS Device
While the Structure Sensor has been carefully designed to work exceptionally well with iOS devices, it has also been designed to work with a wide range of other devices and platforms, including Android devices, Windows, macOS and laptop/desktop computers.
To use Structure Sensor with any of these alternative platforms, you will need the USB Hacker Cable as well as OpenNI 2 drivers, which can be downloaded on our OpenNI 2 page.
USB Hacker Cable
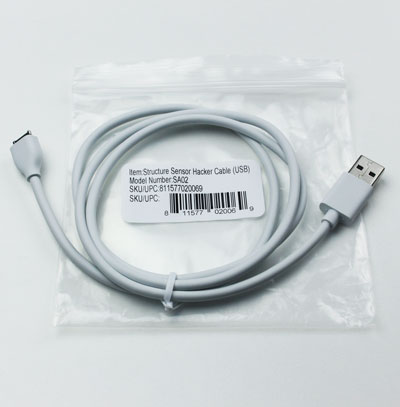
The USB Hacker Cable is an accessory for Structure Sensor. However, it's much more than just a USB cable; it unlocks a number of capabilities already built in to your Structure Sensor.
First and foremost, the Hacker Cable will allow the Structure Sensor to stream 3D data to compatible USB Host devices, such as select Android mobile devices and laptop/desktop machines using macOS, Windows or Linux operating systems.
When connected to a compatible USB device, the Hacker Cable also lets the Structure Sensor:
- Accept power for active use without using its internal battery
- Charge Structure Sensor's internal battery more quickly than the Power Adapter